After being so frustrated with Blogger, I decided to put my blog on a different site. It's a work in progress because I now realize that Blogger is a little easier to design on. BUT, I suppose I should just run through the tutorial!!
My new site is http://dulceshome.com come by and visit! I did copy over all of my old posts - though haven't yet formatted them so that they look pretty again. And the site needs work, but I'm hoping that this will eventually be better! We'll see.
I've posted this week's French Fridays with Dorie episode. Hope to see you soon!
C
Friday, August 5, 2011
Saturday, July 23, 2011
chiles and corn... summer in the Southwest
I have been thoroughly enjoying my time exploring French food with French Fridays with Dorie, but I have a confession to make - it's summer in AZ, and it's difficult to stay focussed on all things French. Well, or at least all foods French. Besides, how could I be considered any kind of "foodie" if I didn't concentrate on whatever is "locally grown"? We have a funny state here. I'm actually from the Northern half. It can be mid-May before temperatures can increase to where things actually grow. And now that I think of it, my foray into CSA groups in central AZ didn't work either - well, I'm thoroughly confused about what grows when - but what I DO know, is that it it corn season in Camp Verde, and that there are a number of wonderful farm stands that are producing lots of terrific things - not to mention the kitchen-garden experiment at home in Sedona.
I'm also the member of a truly delightful book club. Each month one of our members picks and buys, copies of a book we have not yet read, and distributes to the group. The next time we meet, the person who chooses the book, hosts the meeting. We always have a wonderful time (and I have to remind myself not to eat that day, because there is always something yummy!). Sometimes we have food that goes along with what we're reading. Recently, one of our group had picked "Appetite for America" an amazing book about Fred Harvey (go read it - now!). At the back were recipes from his Harvey House restaurants, and we were able to feast on a meal made from the recipes included! How delightful!!
This month is my pick: These is my Words, by an Arizona author - Nancy Turner. Nancy started the book as an exercize for a writing class where she was supposed to write about someone in history that she either admired or was related to. She chose her grandmother - Sarah Agnes Prine.
I had been loaned this book and admonished (strenuously!) that I just had to read it right away. Well, I was probably in the middle of a different book at the time, so I didn't get reading quite that quickly. Once I started however, I stopped after a few pages, immediately set it aside, and ordered copies for our club for my next pick. After being repeatedly asked if I'd liked it (and replying - I don't know, I didn't read it...yet... and repeating my story), I finally was able to read the book. I will not spoil the story, but let's just say... I loved it.
One of the families in the book goes by the name of Maldonado. They are wonderful neighbors, and importantly, make wonderful food. "I could have eaten myself sick on corn tamales and roasted chilies and chicken paella..." "roasted a piece of beef, and it had cilantro and chili in it too". So in keeping with our "sometimes theme", I've been making some Southern Arizona specialties (the story is mainly set just outside of Tucson) to share with my friends.
I decided to make Chile Colorado - a classic Mexican dish of beef cooked in red chiles. And a traditional Tucson dish - (green) corn tamales.

Chile Colorado
5 lbs beef chuck or other flavorful cut, in 1-2" pieces
1/2 c flour
garlic powder to taste
cumin to taste
1 T black pepper
1 T sea salt
1/4 c oil
1 large onion, chopped
1 jar (2 c) Santa Cruz Chile Paste (or about 1/2 c dried ground chiles - like California, New Mexico or Ancho, depending on the effect and heat level you like - just not "chili powder, which is a mix of spices)
beef broth to cover
Mix the dry ingredients together and mix with the beef pieces. Set aside. In large pan, heat oil. Add beef in batches (about 3-4) and brown nicely, not crowding the beef. Bring them out of the pan, while the next amount is being browned. Once beef is browned and out of the pot, add the onions. Cover, and let the onions cook, scraping up the browned bits. Add the beef back to the pot, the chile paste and then broth to cover. Bring to a boil. Lower the heat, cover and cook for about 3 hours until the beef is just tender and the sauce is nice and thick, making sure it does not scorch. You may wish to add some additional liquid if necessary.
Serve with tortillas, chopped onion and cilantro. This is generally quite mild, but you may wish to pass sour cream as well.
Corn Tamales
1 package corn husks - soaked in warm water to soften (it will take about 3-4 oz of dried husks, hydrated)
2-1/2 c fresh corn (either cut off with a shredder designed for creamed corn - or cut off and pulsed in a food processor)
3 c dry masa for tamales
1-1/3 c lard - room temperature
2 T baking powder
1/2 c sugar
4 t salt
fresh green chiles - roasted, peeled, seeded, chopped coarsely
I always put the corn husks into a ziploc bag with warm water, squeezing out all of the air to get the husks pliable. I typically do this hours ahead, just to make sure they are soft. Drain prior to assembling tamales/
Beat the lard with a stand mixer until totally soft and light. Add remaining ingredients. Beat on relatively high speed until light and fluffy. Determine if it's ready by placing a spoonful into a glass of cold water - if it floats, it's probably ready. I've been known to beat the batter a bit more - just because. (let's face it, home made tamales ought to be special - and light is special)
(Traditionally, these tamales can have the green chiles beaten into the batter, or put in the center. Often, a strip of Jack Cheese is put in the center, but I don't always - sometimes the cheese can be tough once it's cooked - there are better ways to get cheese into the "mix". So I did not include here - but it is entirely traditional to do so.)
Prepare a pan for steaming: you'll want plenty of water in the bottom so that over time, it won't dry out. I like to prep a steamer, then line it with husks (in this instance the green ones from the fresh corn I've added to my batter). Reserve more husks to add on top of the prepared tamales, once you've assembled them. The fresh husks will impart a wonderful flavor to your tamales. The pan you will want is fairly tall above the bottom steamer-basket, as the tamales will be about 6" long, and you'll need to be able to cover them. (crushed aluminum foil can make a great base in a large soup pot - once lined with the husks, will keep your tamales out of the water, and still allow for plenty of steam)
Fill the corn husks with dough. Take a husk that is about 6-8" across (or two overlapped to get the same dimension), and place about 1/4 c of the dough onto one quadrant of the husk (if you are unfamiliar, the husks are nearly triangle shaped - they have a wide and a narrow end - so put the batter on the quarter with the wide end, but not all the way to the top), spreading it to be about a 3" square of batter (this is rough, and these are rustic, so it's all ok!), then add some chiles (maybe a tablespoon or so) down the middle vertically. Roll the husk around the filling (there are verticle "ribs" in a husk, so you are rolling along those lines - not against them - try it, you'll soon discover - roll them the easy way), and then fold the narrow bottom half up against the the main part of the tamal to close one end. Place open-ended up, into your prepared steamer pan. As you fill, wrap and stack them, you'll fill up your pan. This recipe makes about 30 +/- tamales, and generally will fill up an average stock-pot (not a dutch oven - halve the recipe for that size pan).
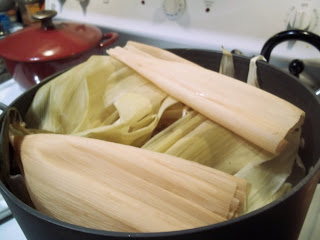
Once the tamales are formed, cover them with another layer of either fresh or the hydrated husks. The fresh husks provide a wonderful flavor, but if you don't have enough, the tamales will still taste great.
Cover and bring the water to a boil. Steam the tamales for about 1-1/2 hours, without letting the pan run dry. To test, pull out one of the tamales from the middle of the pan and put on a plate. The husk should pull away easily from the tamal, and the dough should be light and fluffy with no raw taste remaining. They will finish cooking a bit as you turn off the heat. In any event, you should allow them to rest prior to serving about 10 minutes. Though they will keep for a while before growing cold.

Notes:
- Tamales are best if they are re-heated by steaming - this enhances their very light texture that you've created by beating the batter to create lightness
- They are very nice re-heated in the microwave, however
- Tamales can be frozen
- IF you have leftovers and want to do something different, an iconic casserole is made of these tamales layered with Creme Fraiche or Mexican cream, cheese, sometimes strips of chiles or a good-quality home-made salsa. This is baked just until heated through.
- Uchepos are a very regional Mexican all-fresh corn tamal, that is steamed using the fresh husks rather than dried. There are some who would suggest that these tamales are native to Tucson as well. This recipe is a nod to both. I used sweet corn picked fresh about a week ago, my closest alternative - at least that I'm willing to make! Uchepos are traditionally made from fresh "field corn", which isn't locally available - though if you're reading in the mid-west, I can send you a recipe.
- Except for fresh corn tamales, tamales are generally a holiday food. Because it takes some effort to make them (particularly if they have a meat filling - and by the way - the chile colorado, shredded would be perfect) they are often made at Christmas - dozens and dozens of them. Ladies get together to make them together, splitting up their efforts.
I happen to love Arizona after all of my years here, and it's always delightful to read something set in a location you love. If you get a chance to try either of these recipes, I hope you'll enjoy them. Or if nothing else, check out Sarah's story. I love the dedication - "for everyone who has ever stood alone on a hill in a storm". I think most of us can relate. I hope you enjoy!
(ffwd) paris-brest
I think it was close to a decade ago, maybe more, that I first fell in love with the Tour de France. I was no particular fan of cycling, not even of the movie Breaking Away, but I found myself in a solitary hotel room in Toronto on a business trip, and was drawn into watching a bike race across the French countryside. The network at the time had the iconic maple leaf as its logo, and though the network and the race itself, have changed over the years, it's been a driving force for the month of July. I've made decisions about various television providers, solely based on the inclusion of the current network carrying the TDF. I even bought an HD TV to watch the race, but also the wonderful pictures of France. I lived in Texas at the time (another "hot spot" in the summer) when I fell in love with the Tour, and I wanted an escape from the heat, I now live in Arizona. With due respect to the record temperatures in the rest of the country, we always have to find some alternative for the summer months, for our many hours within-doors, much like the rest of you in those cold, dark winter months. One of our escapes is the Tour.
I was charmed when I found that Dorie included this iconic dessert in her book - that celebrated a famed bike race - Paris-Brest. I am, unfortunately, a single-month-only fan, though I occasionally peek at other results. But, I thought, it would be fun to create some bicycle-themed desserts to enjoy while celebrating the ultimate test of cycling ability.
Dorie's recipe (and the classic dessert, I'm sure), contemplates a large cream puff, resembling a bicycle wheel. I, on the other hand, thought that individual "wheels" would be fun - so I endevoured to create small circles, but still filling with the amazing-sounding filling.
I thought this was a lot of fun to make. If I were having a party, the large, single puff would be lovely with its toasted almonds on top. But this made for a nice little dessert, in honor of the boys of the peleton (who tonight will likely get to have some bubbly of their own. Though tomorrow they still have a ride, the Tour is mostly over - except for that last sprint along the Champs Elyses). Enjoy Paris!
I was charmed when I found that Dorie included this iconic dessert in her book - that celebrated a famed bike race - Paris-Brest. I am, unfortunately, a single-month-only fan, though I occasionally peek at other results. But, I thought, it would be fun to create some bicycle-themed desserts to enjoy while celebrating the ultimate test of cycling ability.
Dorie's recipe (and the classic dessert, I'm sure), contemplates a large cream puff, resembling a bicycle wheel. I, on the other hand, thought that individual "wheels" would be fun - so I endevoured to create small circles, but still filling with the amazing-sounding filling.
 |
| first, the puffs are baked the sliced almonds did not stick to the small puffs and were quickly abandoned I made a combination of "wheels" and tiny puffs, just for fun thank you, my fellow Doristas who recommended leaving the puffs in the oven for a bit |
 |
| blanched almonds are coated in caramel coating and toasted once complete, they go onto parchment to cool then are whirled in a blender to chop finely |
 |
| the chopped carmelized almonds are stirred into a classic vanilla pastry cream and then piped into the wheels |
 |
| dusted with a bit of powdered sugar and served with a glass of French bubbly to toast the heroic efforts of the riders in the TDF (go Mark Cavendish!) |
I thought this was a lot of fun to make. If I were having a party, the large, single puff would be lovely with its toasted almonds on top. But this made for a nice little dessert, in honor of the boys of the peleton (who tonight will likely get to have some bubbly of their own. Though tomorrow they still have a ride, the Tour is mostly over - except for that last sprint along the Champs Elyses). Enjoy Paris!
Thursday, July 7, 2011
ffwd - salmon and tomatoes en papillote
I've been away for awhile, though at the moment, I'm interested in everything French. No, not a trip on the horizon, but the annual epic trip around France (and into Belgium and Spain), known throughout the world as the Tour de France. Usually, I try to plan different French menus throughout the month, to at least conjure up the idea of visiting the Tour. A pilgrimage I would love to make one day.
But, it's corn and chile season in Arizona. Many things converge on the weekend of Independence Day - Wimbledon, the Tour - oh, and fresh corn from Hauser & Hauser Farm in Camp Verde Arizona start selling their locally, family-farmed corn. And wonderful it is. A friend and I made a date to go to breakfast and on to the Farm to pick the first of the season. As we were there, we were instructed to "wait - there's another load coming in", as we watched another tractor bring in a full load of freshly picked corn - driven by a couple of the teenage granddaughters. Over the years, though I don't know the kids, I've still watched them grow up in the family business and passion. It's one that all of us who love good food and our rural history share. So I've been sidetracked by Elote con Crema and other things chile & corn-ish.
But now, it's still Tour time, and time to enjoy some terrific French food. I thought that this was perfect this year because I need look no further than Dorie's wonderful book to find French food-delights to enjoy while watching the unbelievably beautiful French countryside along with cheering on my favorite sprinters and climbers.
Now it's time to cook! This week's recipe presented a couple of challenges: more notably turning on the oven to 475 when it's at least 105 outside; and... it's salmon. My niece would be incredulous to hear this - but it's not my favorite. And then, if I'm having it, my favorite way to prepare it is to grill it - with a few little crispy bits around the edges. But that's not very French - and it's time to start preparing some French food!!
I thought that this was really a nice dish - in parts. I'm not a fan of the combination of tomatoes and salmon (don't know why), but both were wonderful in their own way. I really, really liked the herbs and cooking method for both. And while a tiny bit (well, because of where I shopped!) expensive, a lovely mid-week meal. Or even a terrific one for that last-minute decided-to-have-guests-over weekend night. The combination of herbs, shallots, olive oil with the well-seasoned fish was wonderful. Nice, easy choice for getting back into my "racing form".
But, it's corn and chile season in Arizona. Many things converge on the weekend of Independence Day - Wimbledon, the Tour - oh, and fresh corn from Hauser & Hauser Farm in Camp Verde Arizona start selling their locally, family-farmed corn. And wonderful it is. A friend and I made a date to go to breakfast and on to the Farm to pick the first of the season. As we were there, we were instructed to "wait - there's another load coming in", as we watched another tractor bring in a full load of freshly picked corn - driven by a couple of the teenage granddaughters. Over the years, though I don't know the kids, I've still watched them grow up in the family business and passion. It's one that all of us who love good food and our rural history share. So I've been sidetracked by Elote con Crema and other things chile & corn-ish.
But now, it's still Tour time, and time to enjoy some terrific French food. I thought that this was perfect this year because I need look no further than Dorie's wonderful book to find French food-delights to enjoy while watching the unbelievably beautiful French countryside along with cheering on my favorite sprinters and climbers.
Now it's time to cook! This week's recipe presented a couple of challenges: more notably turning on the oven to 475 when it's at least 105 outside; and... it's salmon. My niece would be incredulous to hear this - but it's not my favorite. And then, if I'm having it, my favorite way to prepare it is to grill it - with a few little crispy bits around the edges. But that's not very French - and it's time to start preparing some French food!!
 |
| my mix of ingredients ready to go I forgot to plan ahead and bring back thyme from up north - I had to buys some I hate that! Our lemon thyme would have been perfect!!! I picked most things up at Whole Foods on the way home I hated paying for the organic cherry tomatoes - but as I popped a few in my mouth while prepping things... yum! a "really" tomato! |
 |
| A simple (and beautiful) preparation |
 |
| sealed up and ready to go |
 |
| 12 minutes later |
 |
| and plated for dinner |
Friday, June 17, 2011
ffwd - roasted rhubarb
I really like rhubarb. I like that it used to be known as "pie plant". Humble, homey. Good on it's own or alongside strawberries. To my mind, very old-fashioned, which has its appeal too.

Since I typically have yogurt and fruit for breakfast every morning, I thought - how fun. This is, of course a super-simple recipe. Not exactly a culinary challenge. OK, so maybe the part about only cooking it for a little while... I got sidetracked watching a ballgame, and didn't turn on the timer. But anyway, I liked the addition of the orange zest. And it really was quite tasty with some yogurt. As Dorie notes, this would be good served in many ways, with many things. Certainly a nice way to enjoy rhubarb without that pie crust (not that I don't like crust - just don't need crust). I'll be enjoying it over the next several days.

Since I typically have yogurt and fruit for breakfast every morning, I thought - how fun. This is, of course a super-simple recipe. Not exactly a culinary challenge. OK, so maybe the part about only cooking it for a little while... I got sidetracked watching a ballgame, and didn't turn on the timer. But anyway, I liked the addition of the orange zest. And it really was quite tasty with some yogurt. As Dorie notes, this would be good served in many ways, with many things. Certainly a nice way to enjoy rhubarb without that pie crust (not that I don't like crust - just don't need crust). I'll be enjoying it over the next several days.
Thursday, June 9, 2011
ffwd - cola and jam spareribs
"The best ribs. Ever!" exclaimed my sister-in-law as she tasted my latest Dorie offering. Now you should know, she's married to my brother, who is pretty well-known for his grilled ribs. In fact, her brother has dubbed him the rib-master... so pretty high praise, and though I kind of felt bad for my bro...well, not so much...
This was one of the recipes that I really wanted to make out of the cookbook. They just sounded like fun. And when I'm in the "valley of the sun" there's no bbq readily available, so I was intrigued with the idea of oven-roasted ribs. Of course, being in the southwest, and having spent a number of years in the Great State of Texas - I knew that for once, I needed to "tweak" the recipe just a little bit. So, while I kept the Chinese Five Spice (I am a convert - I think I've told you of my love of a certain spice cake our mentor Dorie created spotlighting that blend), I decided that I'd use peach jam, add some chipotle, and use Dr. Pepper instead - kind of a Paris, Texas combination...
Now, as people who are serious about their ribs know, there's a prep technique that's important in getting the right texture/tenderness in ribs - so as fair warning to the faint-of-heart, there are a couple of photos that follow that you may wish to avoid. For the rest of you - this is a great trick - whether you cook them with Dorie's method or any other.
As noted above, we really, really liked these. The cooking technique worked perfectly, and produced juicy, nicely crusted ribs. We also liked the Chinese Five Spice - we thought it added a great flavor, though definitely we also liked the smoky kick of the chipotle (I'd add a little more next time, probably). But they were delicious! Not exactly French to me, but delicious! I will definitely make these again.
This was one of the recipes that I really wanted to make out of the cookbook. They just sounded like fun. And when I'm in the "valley of the sun" there's no bbq readily available, so I was intrigued with the idea of oven-roasted ribs. Of course, being in the southwest, and having spent a number of years in the Great State of Texas - I knew that for once, I needed to "tweak" the recipe just a little bit. So, while I kept the Chinese Five Spice (I am a convert - I think I've told you of my love of a certain spice cake our mentor Dorie created spotlighting that blend), I decided that I'd use peach jam, add some chipotle, and use Dr. Pepper instead - kind of a Paris, Texas combination...
Now, as people who are serious about their ribs know, there's a prep technique that's important in getting the right texture/tenderness in ribs - so as fair warning to the faint-of-heart, there are a couple of photos that follow that you may wish to avoid. For the rest of you - this is a great trick - whether you cook them with Dorie's method or any other.
 |
| as you see, some home-made peach jam, added chipotle and little of the Dr. I used baby-backs, simply because that was what I could find in a reasonably-sized package (warning: next two photos are pretty graphic in their depiction of un-cooked ribs) |
 |
| there is a sheet of membrane on the back side of all ribs "they" say that it affects texture - for sure, it keeps any rubs, marinades or other seasonings from getting into the meat from that side to remove - slip your knife under the membrane to start to pull it away from the meat and bones |
 |
| then just pull the sheet of membrane off, exposing the meat on the back side of the ribs it might need to come off in more than one piece I use a paper towel to grip it, and then just pull it off |
 |
| now that the ribs are prepared, the spice mixture is created |
 |
| I put on a generous layer of the "rub" on both the front and back sides I then chilled the ribs for several hours (ok, to be honest, I didn't read the recipe correctly - the marinade could have been added here too - but I only did the rub ahead of time) |
 |
| glazed with the marinade and ready for the oven I basted them as instructed, added the soda and basted them some more I didn't have a problem with the pan burning |
 |
| perfectly cooked - the photo doesn't do them justice I also reduced the juices/marinade in the baking pan to pour over the ribs |
 |
| delicious, meaty ribs with a litle extra sauce |
Saturday, May 28, 2011
ffwd - cardamom rice pilaf
I had the best of intentions. The previous week, I ended up not making the salad until Saturday night and getting nothing posted (well, until a couple of minutes ago). So I thought - do what you used to do, make the dish early, then blog about it and schedule your post!! Great plan, poor execution. Between work and my niece's high school graduation, and... who knows what else. Did not quite go as hoped.
Well. I did make myself make the dish early in the week. But as I write this, it's Saturday - not exactly on time. Part of it was that I really wasn't particularly excited about this dish. I love rice, so I would think I'd like it. But what I really love is some flavorful rice, simly prepared, and then, if it works out - put something fabulous with it - doesn't matter what kind of thing (though Thai curry is never a bad choice). Of course, now that I think of it, I also like jambalaya, and arroz con pollo - so maybe my theory is all out of whack! Rice is actually (assuming you buy a good variety) flavorful on its own. I think this just kind of washed out the rice flavor without replacing it with anything good. Or maybe I just don't like cardamom in savory things.
I did employ my rice cooker for this one - maybe another bad choice. I think I've had two - one I got rid of because I was an expert at cooking rice on the stove, and didn't need yet another appliance. But - a few years later I did get another one and I use it all (all) of the time. It is so handy - and not having to watch something... great. I even gave one to my brother recently because he's on a special diet for a while, and rice is the perfect thing. His wife looked at me like I was crazy when I brought it by, but quickly bonded with it (jasmine rice; replace the water with coconut water... heaven). So I'm a fan. I like K-Paul's method for baking rice too, but here in AZ, it's often too hot to turn on the oven.
I think I just don't like rice done this way (I've tried other recipes). But part of it was certainly my fail. I used the full amount of liquid in the recipe, and that was a mistake. It ended up being over cooked, and mushy. I decided not to plate it for a picture (I did, of course, to eat it!), because it was never going to look better.
Well. I did make myself make the dish early in the week. But as I write this, it's Saturday - not exactly on time. Part of it was that I really wasn't particularly excited about this dish. I love rice, so I would think I'd like it. But what I really love is some flavorful rice, simly prepared, and then, if it works out - put something fabulous with it - doesn't matter what kind of thing (though Thai curry is never a bad choice). Of course, now that I think of it, I also like jambalaya, and arroz con pollo - so maybe my theory is all out of whack! Rice is actually (assuming you buy a good variety) flavorful on its own. I think this just kind of washed out the rice flavor without replacing it with anything good. Or maybe I just don't like cardamom in savory things.
I did employ my rice cooker for this one - maybe another bad choice. I think I've had two - one I got rid of because I was an expert at cooking rice on the stove, and didn't need yet another appliance. But - a few years later I did get another one and I use it all (all) of the time. It is so handy - and not having to watch something... great. I even gave one to my brother recently because he's on a special diet for a while, and rice is the perfect thing. His wife looked at me like I was crazy when I brought it by, but quickly bonded with it (jasmine rice; replace the water with coconut water... heaven). So I'm a fan. I like K-Paul's method for baking rice too, but here in AZ, it's often too hot to turn on the oven.
 |
| additional cheating beyond the rice maker - ground cardamom & lemon peel from Penzey's I tried my coconut water trick here too (in addition to chicken stock base) - not a good idea |
 |
| ready for the liquid |
 |
| done |
ffwd - bacon and eggs and asparagus salad
This is the second time I've made this. The reality is that I think I like the idea better than the result, and individual parts better than the sum. This is a beautiful salad though, and it's fun to make. This time, I decided to try Dorie's method for the ruffly eggs - that was fun, and they turn out kind of cute. I think that would be an easy way to make "poached" eggs ahead of time for something else.
So, here are my thoughts: the dressing needed to have a bit more punch - either more dijon, use only walnut oil (since I was using walnuts in the salad), or something. We liked it, because we like all of the flavors, but it really was missing something in the flavor department. Also, I think these eggs would really look great with a bit of a sauce or dressing with some color drizzled over - to show off the ruffles - they did get a bit lost on this salad, but it was a fun process to try.
Since this is the second time I've made this, and really had the same result, I'll probably choose something different next time - to tweak each of the parts, since I like them all. (hmmmm... the next recipe in Dorie's book - the deconstructed BLT - sounds pretty good ... !)
 |
| we had some red-leaf lettuce in the garden I used that along with some baby spinach to balance the flavors |
 |
| as noted, I decided to try the ruffly poached eggs my "poaching" cups provided an easy container to use to assemble the pouches |
 |
| ready to drop into the pan of simmering water I'm actually not sure if they are cute or creepy at this point... |
 |
| once cooked, the eggs are ready to do a little turn in the bacon grease |
 |
| the assembled salad as an indivicual portion (my picture of the platter didn't turn out) |
Since this is the second time I've made this, and really had the same result, I'll probably choose something different next time - to tweak each of the parts, since I like them all. (hmmmm... the next recipe in Dorie's book - the deconstructed BLT - sounds pretty good ... !)
Friday, May 13, 2011
ffwd - spinach and sausage quiche
I made this the other night, when I was also making a few things since I have family in town for the weekend, and really needed to do some prep up front. Of course, since I was making/prepping about 4 recipes from Dorie's cookbook... well, if you've read my blog before, you'll know that I've skipped a couple of things. Oh well!!
Since I was also making Hachis Parmentier for this evening's meal, that meant that I'd have some leftover Italian Sausage. I've fallen in love with TJ's chicken Italian sausage - I might never use pork again. So I thought... why not have a spinach and sausage quiche? I was already a step or two ahead, since I'd made my pastry for this, when I made it for the torteau (I think I'll do that every time from now on - when I need one, make 2! The more times I use it, the more I like that tart crust recipe).
OK, so given the fact that I was making this at the same time as a bunch of other things, I was really happy with how it turned out. As leftovers, the crust was still crispy too. This was a nice recipe, and given time and inclination, I'd be happy to mix it up too. But really, really good.
Gotta run! Hope everyone enjoys their weekend!!
(fyi, hachis parmentier, braised coconut and lemongrass pork, marinated peppers, lime and honey beet salad... we'll see how it all turns out! cross your fingers for me!)
Since I was also making Hachis Parmentier for this evening's meal, that meant that I'd have some leftover Italian Sausage. I've fallen in love with TJ's chicken Italian sausage - I might never use pork again. So I thought... why not have a spinach and sausage quiche? I was already a step or two ahead, since I'd made my pastry for this, when I made it for the torteau (I think I'll do that every time from now on - when I need one, make 2! The more times I use it, the more I like that tart crust recipe).
 |
| afore-mentioned chicken Italian sausage and spinach |
 |
| my perfectly-baked crust... I remembered to reduce the heat by 25 degrees so that it wouldn't over-bake in my dark tart pan |
 |
| all right, I am lazy! I browned the sausage, onion and garlic together, and just added the spinach by handfuls, and kept turning it until it was all cooked if I'd been worried about serving it to others, I would have given it a rough chop first, but not this time! |
 |
| ready for the oven almost forgot the cheese! |
 |
| the baked quiche! puffed and beautiful if I do say so myself |
 |
| a nice slice, ready for serving |
Gotta run! Hope everyone enjoys their weekend!!
(fyi, hachis parmentier, braised coconut and lemongrass pork, marinated peppers, lime and honey beet salad... we'll see how it all turns out! cross your fingers for me!)
Friday, May 6, 2011
ffwd - tourteau de chevre
It is so fun to get back into my French Friday groove! I've officially missed a couple of weeks, though I have made the mustard batons twice, including for ffwd, but life sometimes gets in the way. Things are back to normal(ish), so it's time to get cooking again!! So inspired, I made both this 'cake', as well as Dorie's cheating-on-winter pea soup. A good day! Oh, and the soup is well-worth making. mmmm
This is an interesting recipe. Particularly since Dorie gave us her story of first tasing a tourteau, and not really knowing what it was supposed to be... a dessert? cheese? Once made, and tasted... I understand.
This is definitely not an American-style cheesecake. I've had several Italian-style ricotta cheesecakes too, but this is something entirely different. In a very good way! Essentially a goat-cheese-filling in a pastry crust. Dorie offered a couple of choices for the crust - both we've made before. Either the regular tart crust, or the sweeter dessert crust. Since I was interested in trying the tourteau both as dessert and also as a cheese course with a nice glass of wine - I decided on the simpler (un-sweet) tart dough. Because we've made that before, I'll just cut to the chase, and concentrate on the filling.
I thought this was lovely! Like Dorie, I couldn't decide - and maybe didn't need to - when this was better served. It was excellent with a glass of wine, though a cup of coffee would be good too! Or even a glass of port after dinner! Breakfast?
This was really fairly light, a nice contrast with the crust and creamy filling. I enjoyed the little bit of tang from the goat cheese, and the amount of sugar was the perfect compliment. I'm sure it would be wonderful with the sweet crust, but I didn't really think it needed it. And as promised, it did hold up for several days - though I will admit it was nicest when freshly made.
I completely expect to make this again. In fact, I'm really just trying to think of when!
This is an interesting recipe. Particularly since Dorie gave us her story of first tasing a tourteau, and not really knowing what it was supposed to be... a dessert? cheese? Once made, and tasted... I understand.
This is definitely not an American-style cheesecake. I've had several Italian-style ricotta cheesecakes too, but this is something entirely different. In a very good way! Essentially a goat-cheese-filling in a pastry crust. Dorie offered a couple of choices for the crust - both we've made before. Either the regular tart crust, or the sweeter dessert crust. Since I was interested in trying the tourteau both as dessert and also as a cheese course with a nice glass of wine - I decided on the simpler (un-sweet) tart dough. Because we've made that before, I'll just cut to the chase, and concentrate on the filling.
 |
| I'm just going to guess, and say that I think I'm probably not the only one who buys an exotic ingredient because I've seen it in a recipe, only to realize that I can't remember exactly which recipe it was... happily, now I have something that requires that fancy bottle of orange-flower water! |
 |
| pretty short list of simple ingredients... |
 |
| first the egg whites get whipped to soft peaks they'll be set aside so we can make the cheesy-part |
 |
| love this - use the same bowl to mix together the yolks, cheese, sugar, corstarch, a pinch of salt - oh, and a little orange flower water |
 |
| this all gets beaten until smooth |
 |
| about a fourth of the whites are folded in to lighten the mixture |
 |
| then the remainder are incorporated I don't get overly concerned - I'd rather err on the side of keeping all of that lovely air in, and not overmixing |
 |
| the tart dough gets rolled out (I love my new mat that has the measurements on it - makes it so easy!) and then placed in the 8" spring-form pan no need to make things perfect here (good thing!) |
 |
| the filling added and then it's popped in the oven much like a pie, it's cooked at a higher temperature for a few minutes, then the temperature is lowered and cooked a bit longer one much easier thing about this cake? no water baths, nothing fussy |
 |
| just out of the oven, beautifully puffed |
 |
| of course, once it cools, the touteau deflates a bit mine isn't quite as brown as Dorie's maybe a bit longer in the oven? I'm not sure it needed it |
 |
| and the sliced touteau! |
I thought this was lovely! Like Dorie, I couldn't decide - and maybe didn't need to - when this was better served. It was excellent with a glass of wine, though a cup of coffee would be good too! Or even a glass of port after dinner! Breakfast?
This was really fairly light, a nice contrast with the crust and creamy filling. I enjoyed the little bit of tang from the goat cheese, and the amount of sugar was the perfect compliment. I'm sure it would be wonderful with the sweet crust, but I didn't really think it needed it. And as promised, it did hold up for several days - though I will admit it was nicest when freshly made.
I completely expect to make this again. In fact, I'm really just trying to think of when!
Friday, April 15, 2011
ffwd - vanilla eclairs
This week's recipe is for a treat that you'd normally pick up at a fancy French bakery. But as you read through the recipes, you find that it's really a combination of a couple of fairly easy components - a baton-shaped cream puff and vanilla pastry cream. These are combined and topped with a simple glaze. Though Dorie offered a few suggested variations, I decided to stick with vanilla.
 |
| for the first part of the recipe - the puffs, I assembled my ingredients |
 |
| the liquids and butter are brought to a boil in a saucepan |
 |
| flour is added all at once, and then combined until it holds together you can see the film on the bottom of the pan - that's when you know you're ready to move on to the next step |
 |
| in my years of making these, until I found Dorie, I'd always mixed in the eggs by hand luckily, she has great ideas, and I'll never go back to using anything other than a stand mixer it makes for the perfect shiny dough once the eggs are incorporated |
 |
| since these puffs needed to be shaped, I decided to use my favorite trick - a ziplock bag - to form them I'll get to throw away that whole mess once I'm done |
 |
| I formed about half of the dough for the eclairs |
 |
| but since I didn't need them all, I formed the remainder into mini cream puffs and also circles the next recipe in AMFT is for Paris-Brest a treat created to celebrate a bike race! it sounds wonderful, and on another day, I'd like to try them so I wanted to form some to put into the freezer to bake later see my bag at the bottom? empty and ready to throw away! |
 |
| once the puffs were piped out, I used my finger, dipped in water, to flatten out the points so that they will bake into nicely-shaped rounds |
 |
| the baked puffs I should have let them sit in the turned-off oven for a bit they eventually fell a bit and flattened |
 |
| on to the pastry cream! |
 |
| this was my first little challenge - my yolks and cornstarch mixture was pretty clumpy |
 |
| after whisking and whisking with the milk, it was still a mess so I used my trusty hand-blender and smoothed it all out! (I wish I'd just used a bit of the cold milk with the yolks and cornstarch to get a smooth paste, and then added the simmering milk) |
 |
| next semi-disaster? as the mixture heated up, it got lumpy again! but with a little vigorous whisking, it came back together to the smooth creaminess I was looking for |
 |
| in goes the vanilla |
 |
| and then the butter once this is complete, it goes to the refrigerator to get chilled |
 |
| my cream puffs, ready to serve the icing came off a bit on the wrap as they chilled in the refrigerator |
 |
| and these are the Coconut Friands that I made using the leftover egg-whites I've made them plain, but here I added a little bittersweet chocolate to some, and macadamias to others |
On the other hand, the coconut friands are definitely a terrific find. I'm looking forward to playing around more with changing them up. And it's super-nice to have a dessert that's super-yummy, tiny, and stays nice for a few days.
I'm looking forward to seeing what everyone else came up with. Should be fun!!
Subscribe to:
Posts (Atom)